
Address autocomplete helps users quickly fill in address fields by suggesting possible matches as they type. It uses address databases to predict and display potential matches, from which the user can select an option.
Address autocomplete minimizes the effort required from the user, so it increases form-completion rates, speeds up the process, and improves user satisfaction. It also ensures the data you collect is accurate and consistent.
- In e-commerce, address autocomplete speeds up the checkout process and reduces cart abandonment rates, leading to higher conversion rates. It also ensures addresses are accurate, leading to fewer delivery issues.
- Address autocomplete in registration forms reduces the amount of typing required from users, leading to higher sign-up rates since users are less likely to be deterred by lengthy forms.
- In logistics applications, address autocomplete ensures that addresses entered are valid, reducing the chances of failed or late deliveries and improving overall operational efficiency.
In this step-by-step tutorial, you’ll learn how to integrate GeoPostcodes data with a React application to build a robust address autocomplete component that enhances your application’s user experience.
Prerequisites
To follow along, you need the following prerequisites:
- Hands-on exposure to Python and React application development
- Node.js v20.10.0 or greater
- Vite. This tutorial uses npm installed with Node.js to create the React application project.
- A GeoPostcodes account. This tutorial uses the sample street database available with the free trial.
- Python v3.9.10 or greater
- Docker Desktop v4.24 or greater
The instructions in this tutorial are for a Windows machine. If your machine has a different operating system and a command doesn’t work, you will need to replace it with the relevant command for your operating system.
Prepare the Project Directory Structure
To start, create a project directory named react-address-autocomplete in your machine.
Inside the project directory, create two subdirectories named backend and frontend to organize the respective files and data.
Inside the backend subdirectory, create two further subdirectories named app and db. The db directory will contain the database-related files and data. The app directory will contain the Python application source code.
Set Up a Database
Next, set up a Posgtres database by creating a file named docker-compose.yml in the db directory and pasting the following YAML code in it:
---
version: '3.9'
services:
  db:
    image: postgres:16
    container_name: geopostcode
    ports:
      - "5432:5432"
    environment:
      # default username and password
      POSTGRES_USER: postgres
      POSTGRES_PASSWORD: DontUseMeAsPassw0rd
      LOGGING_COLLECTOR: on
      LOG_DIRECTORY: /var/log/postgresql
      LOG_MIN_MESSAGES: DEBUG1
    volumes:
      - ./data:/var/lib/postgresql/data
      - ./log:/var/log/postgresql
This code sets up a PostgreSQL database server container with specific configurations for logging, user access, and persistent storage for data and logs.
Open a terminal and switch to the directory in which the docker-compose.yml file is located. Ensure that you have Docker Desktop up and running, and execute the following command to start the database in a docker container:
docker compose up -d
Execute the following command to check the status of the container:
docker ps
You should see the following output:
CONTAINER ID   IMAGE         COMMAND                  CREATED      STATUS         PORTS                    NAMES
8d5fe173bf63   postgres:16   "docker-entrypoint.s…"   3 days ago   Up 2 seconds   0.0.0.0:5432->5432/tcp   geopostcode
Keep this terminal open.
Import GeoPostcodes Data
Now that you have a running database, you need realistic and accurate street data that your address autocomplete feature will use. In this tutorial, you’ll use a sample of US street addresses—specifically the North America, sample countries dataset—that are available with GeoPostcodes’s free trial.
Log in to the GeoPostcodes portal and select Street database samples from the Download Center.

In the next screen, download the North America, sample countries dataset.

The downloaded file will be named something like GPC-STRT-GEO-SAMPLE-A1-SELECTED.zip. The zip file contains a CSV directory, which contains our desired CSV file, GPC-STRT-GEO-SAMPLE-A1-SELECTED.csv. Once you have the sample street dataset (GPC-STRT-GEO-SAMPLE-A1-SELECTED.csv) in CSV format, you’ll import this data into the Postgres database.
Execute the following command in the terminal you used earlier to log in to the database container’s shell:
docker exec -it geopostcode bash
You will see an output similar to the one below indicating that you are inside the container’s shell prompt:
root@8d5fe173bf63:/#
Once you are in, switch the user to postgres by executing the following command in the container’s shell:
su - postgres
Log in to the Postgres database’s psql prompt by executing this command:
psql -Upostgres
Create a database named geopostcodes by executing this SQL command:
create database geopostcodes;
Switch the current database to the GeoPostcodes database you downloaded earlier by executing this command:
\c geopostcodes
Create a table named address_details by executing this SQL command:
CREATE TABLE address_details (
    iso CHAR(2) NOT NULL,
    country VARCHAR(255) NOT NULL,
    language VARCHAR(255),
    Id BIGINT PRIMARY KEY,
    region1 VARCHAR(255),
    region2 VARCHAR(255),
    region3 VARCHAR(255),
    region4 VARCHAR(255),
    locality VARCHAR(255) NOT NULL,
    postcode VARCHAR(255),
    suburb VARCHAR(255),
    street VARCHAR(255),
    range VARCHAR(255),
    building VARCHAR(255),
    latitude FLOAT,
    longitude FLOAT,
    elevation INTEGER,
    iso2 CHAR(10),
    fips VARCHAR(20),
    nuts VARCHAR(255),
    hasc VARCHAR(255),
    stat VARCHAR(255),
    timezone VARCHAR(255),
    utc INTERVAL,
    dst INTERVAL,
    locality_type VARCHAR(255)
);
This table structure complies with the GeoPostcodes street dataset file to ensure that the import operation is successful.
Execute the following command to exit from the psql prompt:
exit
Keep this terminal open.
Open an explorer window (file browser window in Windows) in your machine and navigate to the db’s data directory:

Place the CSV file (GPC-STRT-GEO-SAMPLE-A1-SELECTED.csv) inside the data directory.
Switch back to the container shell terminal and execute the following command as a Postgres user:
psql -Upostgres -d geopostcodes -c "\COPY address_details FROM '/var/lib/postgresql/data/GPC-STRT-GEO-SAMPLE-A1-SELECTED.csv' DELIMITER ';' CSV HEADER;"
This command imports data from the CSV file named GPC-STRT-GEO-SAMPLE-A1-SELECTED.csv into a table named address_details within the geopostcodes database on the PostgreSQL server. It uses semicolon (;) as the field delimiter and recognizes the first line as containing column headers.
You should see an output similar to the one below indicating that you have successfully imported the sample data into the target database table:
COPY 200
Setting Up the Backend API for Address Data
Now that you have the data ready to go, you’ll build a backend application that will share this data with the user interface (frontend) through an API.
Open a terminal and switch to the project’s backend/app directory. Execute the following command to create a new Python virtual environment for the backend application development:
python -m venv venv
Activate the virtual environment by executing the following:
venv\Scripts\activate
Create a new file named requirements.txt and paste the following dependencies list in it:
blinker==1.8.2
click==8.1.7
colorama==0.4.6
Flask==3.0.3
Flask-Cors==4.0.1
Flask-SQLAlchemy==3.1.1
greenlet==3.0.3
importlib_metadata==7.2.0
itsdangerous==2.2.0
Jinja2==3.1.4
MarkupSafe==2.1.5
psycopg2==2.9.9
SQLAlchemy==2.0.31
typing_extensions==4.12.2
Werkzeug==3.0.3
zipp==3.19.2
Out of these many dependencies, the key ones are Flask, Flask-Cors, Flask-SQLAlchemy, and pycopg2. The rest are transparent dependencies to these key libraries.
This app uses Flask as the core framework to build the backend Python application. It provides the foundation for handling requests and responses and structuring your code. The Flask-Cors dependency allows the application to communicate with the frontend sites securely. Flask-SQLAlchemy helps connect the Flask application to a database, simplifying interacting with databases and managing your data. Finally, psycopg2 is a database driver that allows Flask-SQLAlchemy to communicate with PostgreSQL databases. It translates between your Python code and the database language.
Execute the following command in the terminal pointing to the app directory for installing the dependencies:
pip install -r requirements.txt
Create the file main.py in the same app directory and paste the following code in it:
from flask import Flask, jsonify, request
from flask_cors import CORS
from models import db, AddressDetails

app = Flask(__name__)
cors = CORS()
cors.init_app(app)

# Configure the database URI
app.config['SQLALCHEMY_DATABASE_URI'] = 'postgresql://postgres:DontUseMeAsPassw0rd@localhost/geopostcodes'
app.config['SQLALCHEMY_TRACK_MODIFICATIONS'] = False

db.init_app(app)


@app.route('/api/address', methods=['GET'])
def get_address_details():
    street = request.args.get('street')
    if not street:
        return jsonify({'error': 'street parameter is required'}), 400

    # addresses = AddressDetails.query.filter_by(street=street).all()

    # Perform pattern-based search using ilike
    search_pattern = f"%{street}%"
    addresses = AddressDetails.query.filter(AddressDetails.street.ilike(search_pattern)).all()

    results = [{
        'iso': address.iso,
        'country': address.country,
        'language': address.language,
        'id': address.id,
        'region1': address.region1,
        'region2': address.region2,
        'region3': address.region3,
        'region4': address.region4,
        'locality': address.locality,
        'postcode': address.postcode,
        'suburb': address.suburb,
        'street': address.street,
        'range': address.range,
        'building': address.building,
        'latitude': address.latitude,
        'longitude': address.longitude,
        'elevation': address.elevation,
        'iso2': address.iso2,
        'fips': address.fips,
        'nuts': address.nuts,
        'hasc': address.hasc,
        'stat': address.stat,
        'timezone': address.timezone,
        'utc': str(address.utc),
        'dst': str(address.dst),
        'locality_type': address.locality_type
    } for address in addresses]

    return jsonify(results), 200


if __name__ == "__main__":
    app.run(host='0.0.0.0', port=5000, debug=True, use_reloader=True)
This Python code builds a web API for searching addresses. It connects to a PostgreSQL database with the connection string specified as part of the configuration variable SQLALCHEMY_DATABASE_URI and uses Flask to handle requests.
The /api/address endpoint allows users to search for addresses by providing a street name that is not case-sensitive. The code validates user input by ensuring the value of the parameter street is specified and returns matching address details in JSON format if successful. The code also configures the application server to listen on port 5000 for easy testing.
One of the import statements, as well as the code, expects a model named AddressDetails to be present to have a mapping of the database table.
Next, create a file named models.py to include the code for the model:
from flask_sqlalchemy import SQLAlchemy

db = SQLAlchemy()

class AddressDetails(db.Model):
    __tablename__ = 'address_details'

    iso = db.Column(db.String(2), nullable=False)
    country = db.Column(db.String(255), nullable=False)
    language = db.Column(db.String(255))
    id = db.Column(db.BigInteger, primary_key=True)
    region1 = db.Column(db.String(255))
    region2 = db.Column(db.String(255))
    region3 = db.Column(db.String(255))
    region4 = db.Column(db.String(255))
    locality = db.Column(db.String(255), nullable=False)
    postcode = db.Column(db.String(255))
    suburb = db.Column(db.String(255))
    street = db.Column(db.String(255))
    range = db.Column(db.String(255))
    building = db.Column(db.String(255))
    latitude = db.Column(db.Float)
    longitude = db.Column(db.Float)
    elevation = db.Column(db.Integer)
    iso2 = db.Column(db.String(10))
    fips = db.Column(db.String(20))
    nuts = db.Column(db.String(255))
    hasc = db.Column(db.String(255))
    stat = db.Column(db.String(255))
    timezone = db.Column(db.String(255))
    utc = db.Column(db.Interval)
    dst = db.Column(db.Interval)
    locality_type = db.Column(db.String(255))
This model file serves as a mapping to the database table address_details that you created earlier.
Start the Backend Application
Start the Flask app by executing the following command in the terminal pointing to the project’s backend/app directory:
flask --app main.py run
You should see an output similar to the one below:
 * Serving Flask app 'main.py'
 * Debug mode: off
WARNING: This is a development server. Do not use it in a production deployment. Use a production WSGI server instead.
 * Running on http://127.0.0.1:5000
Press CTRL+C to quit
You can see that the Flask application server is started and listening for requests on port 5000.
Test the API
Now that you have a running backend application, you’ll test whether the API retrieves the data that you expect it to.
Open a browser and paste the following URL in the address bar:
http://localhost:5000/api/address?street=East
You should see an output fetching the records from the address_details table in Postgres. It will be filtered by street name containing a string value of East.

This means that you’ve successfully built and tested the backend application.
Keep the backend app running as you will need it to serve the API calls from the frontend React application.
Set Up the React Application
Now that your backend is set up, you’ll set up the React application with the autocomplete component to use GeoPostcodes data from your backend for accurate address suggestions.
Open a terminal and switch to the project’s frontend directory that you created earlier. Execute the following command to create a React template application using Vite:
npm create vite@latest react-address-autocomplete-app -- --template react
You should see a prompt seeking your input:
Need to install the following packages:
[email protected]
Ok to proceed? (y) y
Provide y as your input. The command will get executed and the output will be as follows:
Scaffolding project in C:\Users\admin\Documents\Personal\GitHub\react-address-autocomplete\frontend\react-address-autocomplete-app...

Done. Now run:

  cd react-address-autocomplete-app
  npm install
  npm run dev

npm notice
npm notice New minor version of npm available! 10.2.4 -> 10.8.1
npm notice Changelog: https://github.com/npm/cli/releases/tag/v10.8.1
npm notice Run npm install -g [email protected] to update!
npm notice
As you can see, as part of the step above, a new directory named react-address-autocomplete-app has been created. Edit the file package.json from this directory and add the axios dependency in the dependencies section, as shown below:
  "dependencies": {
    "axios": "^1.7.2",
    "react": "^18.2.0",
    "react-dom": "^18.2.0"
  },
axios is an HTTP client library that will be used to make the API calls to the backend app you created earlier.
Next, edit the index.html file and update the title tag value as follows:
<title>Address Auto-Completion</title>
Switch the terminal to the newly created React app project directory:
cd react-address-autocomplete-app
Install dependencies with npm:
npm install
Keep this terminal alive.
Create the Autocomplete Component
You’re now ready to create the autocomplete component.
Switch to the src directory inside react-address-autocomplete-app and edit the App.jsx file. Replace the existing code there with the following:
import AddressAutocomplete from './AddressAutocomplete';

const App = () => {
  return (
    <div>
      <AddressAutocomplete />
    </div>
  );
};

export default App;
The code above imports a React component named AddressAutocomplete and renders it in the user interface. This component will contain the complete HTML elements and logic for address autocompletion, which is what you’ll create next.
Create a file named AddressAutocomplete.jsx in the src directory and paste the content below into it:
import { useState } from 'react';
import axios from 'axios';

const AddressAutocomplete = () => {
  // State to store the value of the input fields
  const [inputValue, setInputValue] = useState('');
  const [city, setCity] = useState('');
  const [state, setState] = useState('');
  const [postCode, setPostCode] = useState('');

  // State to store the fetched suggestions
  const [suggestions, setSuggestions] = useState([]);
  // State to manage loading state
  const [isLoading, setIsLoading] = useState(false);

   /**
   * Fetch suggestions from the backend API based on the input query.
   *
   * @param {string} query - The input value to search for.
   */
    const fetchSuggestions = async (query) => {
    if (!query) {
      setSuggestions([]);
      return;
    }

    setIsLoading(true);

    try {
      // Make a GET request to the backend API
      const response = await axios.get(`http://localhost:5000/api/address?street=${query}`);
      console.log(response.data)
      setSuggestions(response.data || []);
    } catch (error) {
      console.error('Error fetching suggestions:', error);
      setSuggestions([]);
    } finally {
      setIsLoading(false);
    }
  };

  // Handle input change
  const handleInputChange = (event) => {
    const value = event.target.value;
    setInputValue(value);
    fetchSuggestions(value);
  };

  /**
   * Handle the click event on a suggestion.
   *
   * @param {object} suggestion - The selected suggestion.
   */
    const handleSuggestionClick = (suggestion) => {
    setInputValue(suggestion.street);
    setCity(suggestion.locality); // locality represents the city
    setState(suggestion.region1); // region1 represents the state
    setPostCode(suggestion.postcode);
    setSuggestions([]);
  };

  return (
    <div style={{ padding: '20px' }}>
      <h1>Address Auto-Completion</h1>
      <div>
        <label>Street:</label>
        <input
          type="text"
          value={inputValue}
          onChange={handleInputChange}
          placeholder="Enter street name"
          style={{ width: '100%', padding: '8px', boxSizing: 'border-box' }}
        />
        {isLoading && <div>Loading...</div>}
        {suggestions.length > 0 && (
          <ul style={{ border: '1px solid #ccc', listStyleType: 'none', padding: 0, margin: 0 }}>
            {suggestions.map((suggestion, index) => (
              <li
                key={index}
                onClick={() => handleSuggestionClick(suggestion)}
                style={{ padding: '8px', cursor: 'pointer' }}
              >
                {suggestion.street}
              </li>
            ))}
          </ul>
        )}
      </div>
      <br>
      </br>
      <div>
        <label>City:</label>
        <input
          type="text"
          value={city}
          readOnly
          style={{ width: '100%', padding: '8px', boxSizing: 'border-box', marginTop: '10px' }}
        />
      </div>
      <br>
      </br>
      <div>
        <label>State:</label>
        <input
          type="text"
          value={state}
          readOnly
          style={{ width: '100%', padding: '8px', boxSizing: 'border-box', marginTop: '10px' }}
        />
      </div>
      <br>
      </br>
      <div>
        <label>PostCode:</label>
        <input
          type="text"
          value={postCode}
          readOnly
          style={{ width: '100%', padding: '8px', boxSizing: 'border-box', marginTop: '10px' }}
        />
      </div>
    </div>
  );
};

export default AddressAutocomplete;
The AddressAutocomplete.jsx component provides a user-friendly interface for address entry. It features an input field for Street and read-only fields for City, State, and PostCode.
As the user types in a street address, the component fetches and displays address suggestions from the backend API. Upon selecting a suggestion, the component populates the corresponding City, State, and PostCode fields, ensuring accurate and efficient address entry.
Some things to note:
This tutorial uses a very simple UI screen design and logic. An alternative would be to allow users to enter the state and city, possibly using validation or autocomplete for these fields. The system can then offer more precise street suggestions. Another option could be to allow users to enter the full address (state, city, postcode, and street) in a single text field, followed by validation—a more complex but streamlined option.
The
debouncefunction from the lodash library would improve the efficiency of this address autocomplete feature. Debouncing helps prevent making too many requests to the server by limiting how often thefetchSuggestionsfunction is called (and, in turn, the calls made to the backend) as the user types. It’s not implemented to keep the tutorial straightforward.
Test the App
You’re now ready to see your app in action.
Switch to the terminal pointing to the React application and execute the following command to start the frontend application:
npm run dev
You should see an output like this one:
  VITE v5.3.1  ready in 350 ms

  ➜  Local:   http://localhost:5173/
  ➜  Network: use --host to expose
  ➜  press h + enter to show help
Open a browser and navigate to http://localhost:5173/, where you should see the home page:

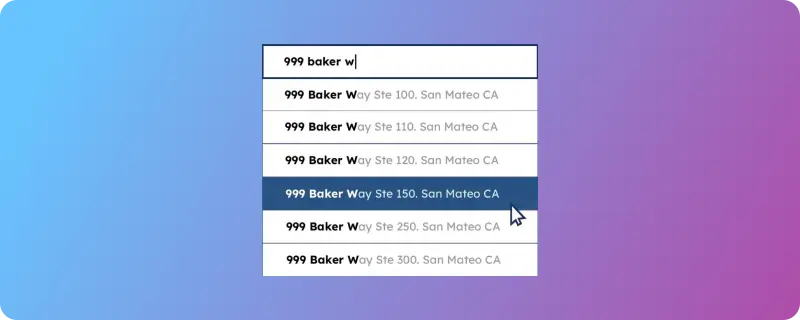
If you key in the value East in the Street input field, it will trigger a backend API call and display the list of street addresses from the sample database that contains the text value East:

You can select your street of choice to see how the corresponding values of City, State, and PostalCode are autopopulated:

Why Street-Only Input Can Lead to Poor UX
Allowing users to input only a street name and relying on the system to predict additional details such as state, city, and postal code can result in a frustrating and inaccurate user experience. For example, across the US, there are more than 6,000 streets named “Main Street” and over 4,000 “Oak Streets.” Without additional context, like city or state, the system would struggle to differentiate between them, leading to confusion or incorrect address suggestions.
A Better Approach: State and City First
A more user-friendly solution would involve first asking the user to input the state and city, using autocomplete functionality to validate and assist with these entries. Once these details are provided, the system can then narrow down the street options, making the autocomplete much more accurate and relevant to the user’s location.
By doing so, not only does the system become more efficient, but it also reduces the risk of wrong address suggestions, enhances accuracy, and improves the overall user experience.
Conclusion
Congratulations! You now know how to build a React address autocomplete component.
Keep in mind that your address autocomplete feature only improves user experience and data accuracy if it uses accurate and comprehensive address data to ensure that your autocomplete component delivers precise and relevant suggestions.
In this tutorial, you used GeoPostcodes’ sample database, which is available with the free trial and gave you accurate addresses. For an actual use case, you’d want to use GeoPostcodes’ comprehensive database to ensure you’re working with complete address data.
FAQ
What is address autocomplete in React, and how does it work?
Address autocomplete simplifies user input by suggesting potential addresses as the user types.
It leverages APIs like the Google Maps JavaScript API, specifically using the Places library to return predictions based on partial inputs.
How do I implement address autocomplete using the Google Maps JavaScript API?
To implement address autocomplete, you need to include the Google Maps JavaScript API in your project and integrate the Places library to access the autocomplete widget.
The widget listens to user input and suggests addresses using address_components from the Places API.
What are address components in Google Maps API, and why are they important?
Address_components are the parts of an address, such as street name, city, and postal code.
In the context of autocomplete, they help ensure the accuracy of the address suggestions by breaking down user input into manageable pieces.
How can I customize the address autocomplete widget in React?
Customizing the widget can be done by controlling the fields and components returned by the API.
You can specify which address fields you want to be displayed (e.g., postal codes or cities) by adjusting the autocomplete options in the maps API call.
What is the best way to handle address selection using React?
After selecting an address from the autocomplete list, you can use React state to capture and display the selected address, along with any relevant address_components like postal code, city, or country.
Make sure to handle the API response efficiently for a smooth user experience.